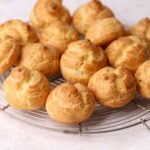
Choux Pastry (Pate a Choux)
This classic French choux pastry bakes up puffy and golden with a hollow center, and you only need 7 simple ingredients. Use the dough to make cream puffs, éclairs, Paris-Brest, and so much more!
Servings: 28 servings
Calories: 62kcal
Ingredients
- ½ cup water
- ½ cup milk or swap in more water
- ½ cup unsalted butter cut into 8 tablespoons
- ½ teaspoon salt
- 1 teaspoon sugar
- 1¼ cups all-purpose flour
- 4 large eggs
Instructions
- Preheat oven to 375℉.
- Optional: Trace a piping guide on your parchment so your puffs come out the same size. Cut a sheet of parchment to fit your baking sheet and lay a ruler across the middle. On the half closest to you, use a 2-inch round cutter and a pen or pencil to trace a row of 3 circles along the ruler, leaving at least 2 inches between them. Below that, trace a row of 4 circles staggered in the gaps between the first three. Rotate the sheet 180° and repeat on the other half, for 14 circles in total. Flip the parchment over before using it so you don't pipe onto the ink.
- Line 1-2 baking sheets with parchment paper and set aside.
- Sift the flour over a sheet of parchment paper or bowl. Set the flour close to the stovetop so it's ready to add when needed.
- Use a whisk or fork to lightly whisk the eggs in a medium bowl. Set aside.
- Add the water, milk, sugar, salt, and chopped butter to a medium saucepan over medium heat. Stir often with a spatula until the sugar and salt have dissolved and the butter has melted completely.
- Once the butter has melted, bring the mixture to a rolling boil then remove the pan from the heat. Immediately add all the flour all at once. Use a wooden spoon or sturdy spatula to beat the flour in vigorously for about 15 seconds until no dry flour remains and a smooth, thick paste (called a panade) forms.
- Return the pan to heat and keep stirring until the dough pulls away from the sides of the pan and a thin white film forms on the bottom. This usually takes between 45 seconds to 1 minute.
- Transfer the dough to a large bowl or to the bowl of an electric mixer fitted with a paddle attachment. Stir it with a spatula or mix it on low speed with the stand mixer or hand held mixer for about 2 minutes to help it cool down to approximately 140℉ (60℃).
- Start by adding about half of the beaten eggs into the dough, stirring it in with a sturdy spatula or mix on medium low speed with an electric mixer. Mix well until the egg is completely incorporated. Next, stir or mix in about 50% of the remaining egg then add 50% of the remaining egg. Check the consistency before adding more egg.
- To check the consistency: Lift your spatula (or lift the beaters or paddle), the dough should fall off slowly and leave a thick "V" shape hanging from the spatula (or beaters or paddle). It should be smooth and glossy but thick enough to hold its shape when piped. Stop adding egg as soon as your dough is the right consistency. You may not end up using all the egg.
- Now the dough is ready to be piped and baked. I'm making shells for cream puffs below, but you can pipe the same dough into éclairs, profiteroles, or Paris-Brest.
- For cream puffs: Fill a piping bag fitted with a small round nozzle about halfway. (If you don't have a piping bag or nozzle, use a large Ziptop bag and snip a corner).
- Set the baking sheet against the edge of your counter with the long side in front of you. Picture a line running lengthwise across the middle of the tray, splitting it into two halves. Start at the top of the half closest to you, right below the imagined line. Hold the bag straight above the baking sheet, with the tip just above the spot where you want the puff. Don't move the bag while you pipe. Pipe a row of 3 puffs across. Squeeze once until the mound is about 2 inches (5 cm) wide, then stop squeezing and flick the tip to the side to "cut" the dough. Space the mounds about2 inches apart. Tip: If you didn't trace circles as a guide as described in step 2 above, you can count seconds while you pipe so all your puffs are the same size. Squeeze for about 4 seconds per puff, then stop and lift the bag straight up. Adjust the count to fit your tip size, and keep the same count for every puff!
- Then pipe a row of 4 below it, staggered so each puff sits in the gaps of the row above. Rotate the tray and repeat on the other half. That makes 7 puffs per half, 14 in total.
- Optional- lightly wet your finger with water and gently press down any peaks.
- Bake at 375℉ for 25-30 minutes until puffed up and golden brown. To check that the choux are finished baking, lightly tap on them. They should sound hollow. Slide choux off onto to a wire rack to cool.
- Cool completely before filling. Fill with anything you like! See filling options below in the notes section.
Notes
Milk and water: You can use water, milk or a combination of milk and water. I prefer using both milk and water. It makes them more smooth on top and helps choux develop more regularly.
Bring liquid to a full rolling boil before adding the flour: If the mixture doesn't fully boil, you'll end up with a gooey paste instead of a dough that holds its shape.
Know when the dough is done. After stirring in the flour, cook the dough for about 1 minute, stirring constantly. It's better to rely on clues for doneness instead of time. The clues to watch for: dough pulls away from the sides of the pan and a thin white film forms on the bottom of the pan.
Adding the eggs: Lightly whisk all the eggs together before you start incorporating them. The amount of the eggs you need will vary based on on how much moisture evaporated from your dough while cooking it. You may not end up needing to add all of them. Check your dough’s consistency as a guide.
How to know when to stop adding eggs/when the dough is ready to be piped: Lift your spatula (or lift the beaters or paddle), the dough should fall off slowly and leave a thick "V" shape hanging from the spatula (or beaters or paddle). It should be smooth and glossy but thick enough to hold its shape when piped.
Is your dough too thick after adding the eggs? If you used all the egg and it's still too thick, mix in a tiny bit more milk or water. Avoid adding more egg than the recipe calls for. You want it to be firm enough to pipe but not liquidy. It's better for your dough to be a little more liquidy than too solid.
Tracing guide for piping (optional): Use a pen or pencil to trace 2-inch circles at least 2 inches apart for cream puffs. Flip the parchment paper over before using so that you don't pipe on the ink.
Piping bag: Make sure not to overfill the bag. A smaller amount is easier to squeeze and control. You can refill it as you go.
Piping: Use your non-dominant hand to hold the bottom part of your piping bag steady. Apply pressure from your dominant hand. Rotating the tray helps you pipe closer and helps prevent you from accidentally touching the ones you've already piped. Hold bag vertically for cream puffs and at a 45-degree angle for éclairs. Stop applying pressure before lifting or pulling away the tip. Optional: gently press down on any points with a lightly dampened fingertip.
Filling options: There are many options for filling cream puffs, such as pastry cream, whipped cream, chantilly cream, chocolate ganache, jam, and lemon curd. You can also use a savory filling since the shells are mild in flavor and not sweet.
Storing the dough: Cover and refrigerate dough for up to 3 days or freeze in an airtight container for up to 3 months. You can also transfer it to a piping bag and refrigerate it in the bag. Thaw in the fridge before shaping and baking.
Storing baked shells: Cool unfilled shells completely before storing. Once cooled, store them in an airtight container at room temperature for up to 1 day or freeze for up to 1 month.
Storing filling shells: Refrigerate filled puffs in an airtight container for up to 24 hours. It's best to fill shells as close to serving as possible. Optional: reheat unfilled shells at 350°F for 4–6 minutes, then cool completely before filling.
Nutrition
Serving: 1serving | Calories: 62kcal | Carbohydrates: 5g | Protein: 2g | Fat: 4g | Saturated Fat: 2g | Polyunsaturated Fat: 0.3g | Monounsaturated Fat: 1g | Trans Fat: 0.1g | Cholesterol: 33mg | Sodium: 53mg | Potassium: 22mg | Fiber: 0.2g | Sugar: 0.4g | Vitamin A: 142IU | Calcium: 11mg | Iron: 0.4mg
