Would you like to save this?
I first made these poop emoji cupcakes as a joke, but they surprisingly turned out to be one of the most delicious cupcakes I’ve ever made! That’s because they’re made with a moist, tender chocolate cupcake and topped with a super rich and creamy chocolate buttercream frosting! It’s amazing how delicious these cupcakes look and taste despite being poop emojis!
WHY MAKE POOP EMOJI CUPCAKES?
So my husband has this cousin who sort of acts like a pest/annoying little brother. We love him for that! Last year, before coming home for Christmas, he started sending me requests for things to bake for him and even complained that I never make him anything. It was then that I decided to make him these poop emoji cupcakes. They were the perfect treat/joke for him.
In addition to making these as a joke for someone, they’re also super popular with kids! Make them for fun or for a birthday party and kids will LOVE them!
These cupcakes are very easy to make which makes them even more of an option to make with kids. You can have kids help out with the baking or just bake the cupcakes ahead of time and have the kids help put the eyes and mouths on.

WHAT MAKES THEM SO MOIST?
These cupcakes have a super moist texture thanks to the oil. I used canola but you can also use vegetable oil. In addition to giving the cupcakes a nice, moist texture, using oil instead of butter makes them easier to make. No need to cream the butter or wait for it to soften!
Another ingredient that makes these cupcakes moist is buttermilk. If you don’t have any on hand, and don’t think you’ll use more than the 1/2 cup that this recipe calls for, you can easily sour your milk at home.
MIXING THE BATTER
Start by whisking the flour, cocoa, baking powder, baking soda, and salt together. Set the dry ingredients aside. Next, whisk the egg with the oil until smooth. Add the vanilla then pour half of the wet mixture along with the buttermilk into the dry ingredients. Whisk until just combined then add the remainder of the wet mixture. Stir until just combined, being careful not to over mix.

Pour the batter into the cupcake tin. Fill each cup 2/3 full. Bake 18-21 minutes or until a toothpick comes out clean. Allow to cool 10 minutes in the cupcake tin then transfer to a wire rack to cool. Cool completely before frosting.

CHOCOLATE BUTTERCREAM RECIPE
This silky, creamy chocolate buttercream is the perfect topper to these cupcakes! What’s not to love about butter, powdered sugar, cocoa, milk and vanilla!?
You can use dutch processed cocoa or regular cocoa for the frosting. Also, for a slightly richer frosting, try swapping out the milk for heavy cream!
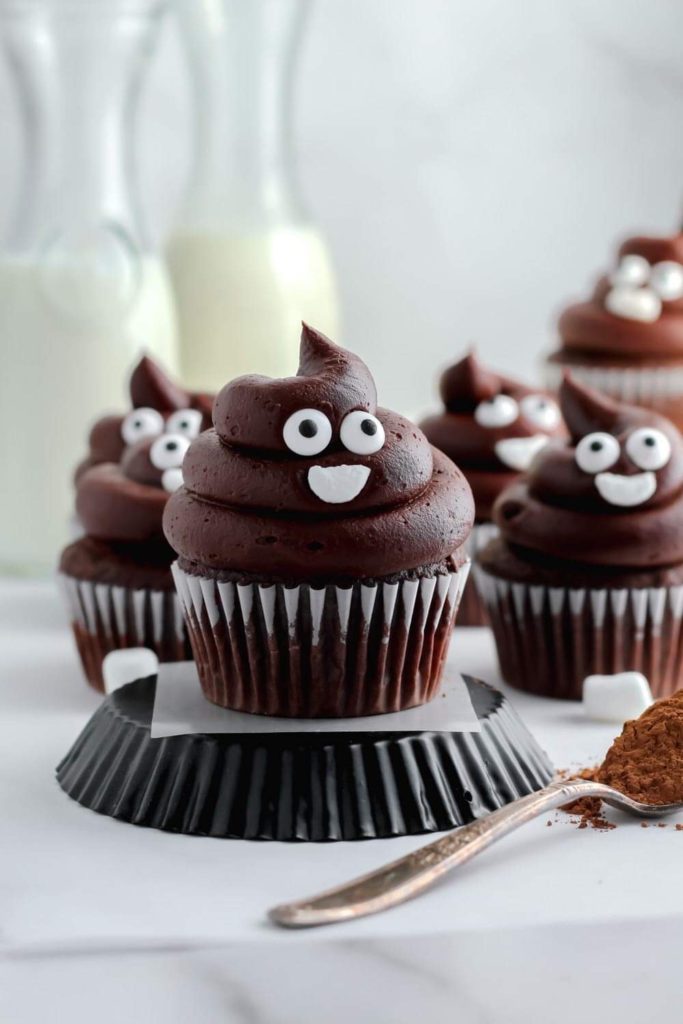
DECORATING THE CUPCAKES
Besides eating them, decorating these cupcakes is my favorite part! You’ll need a pastry bag with a large round tip. I used an Ateco 808, but any round tip should work. The wider the tip, the better.
Pipe the buttercream in a circular, upward motion and make sure to lift the tip upward when you get to the top to create the signature poop emoji look!
I found candy eyes in the baking aisle of my local grocery store. You should be able to find them as well. For the mouths, I got the idea to use mini marshmallows for the mouth from watching this poop emoji tutorial!

These moist, chocolatey poop emoji cupcakes with the rich, creamy chocolate buttercream and cute, fun faces will make everyone smile! They’re easy to make, fun to make with kids, and will bring delight to anyone who sees and eats them! Perfect for birthdays or anytime you want a sweet, fun treat!
FOR MORE EASY AND DELICIOUS CUPCAKE RECIPES, MAKE MY:
- BOSTON CREAM PIE CUPCAKES
- BUTTERSCOTCH CREAM CHEESE CUPCAKES
- NUTELLA STUFFED CHOCOLATE CUPCAKES
- CUPCAKES WITH HEARTS IN THE MIDDLE

Poop Emoji Cupcakes
Ingredients
FOR THE CUPCAKES
- 1 cup flour
- ½ cup unsweetened natural cocoa powder
- 1 teaspoon baking powder
- ½ teaspoon baking soda
- ½ teaspoon salt
- 1 cup sugar
- ⅓ cup canola or vegetable oil
- 1 large egg
- 1 ½ teaspoon vanilla
- ½ cup plus 3 tablespoons buttermilk room temperature
FOR THE CHOCOLATE BUTTERCREAM
- 1 stick plus 6 tablespoons unsalted butter room temperature
- 3 cups powdered sugar sifted
- ½ cup plus 2 tablespoons cocoa sifted
- 2-3 tablespoons milk or heavy cream
- pinch of salt
- 1 ½ teaspoon vanilla
FOR THE DECORATIONS
- 24-28 googly candy eyes
- mini marshmallows quartered
Instructions
- Preheat oven to 350 F. Line a cupcake tin with liners.
- In a large bowl, sift the flour, cocoa, baking powder, baking soda, and salt together. Set aside.
- In a medium sized bowl, whisk the egg and sugar with the oil until smooth. Add the vanilla then pour half of the wet mixture along with the buttermilk into the dry ingredients. Whisk until just combined then add the remainder of the wet mixture. Stir until just combined, being careful not to over mix.
- Pour the batter into the cupcake tin. Fill each cup about 2/3 full.
- Bake 17-21 minutes or until a toothpick comes out clean. Allow to cool 10 minutes in the cupcake tin then transfer to a wire rack to cool. Cool completely before frosting.
- FOR THE CHOCOLATE BUTTERCREAM
- Sift the cocoa, powdered sugar and salt together and set aside.
- Beat the butter on medium speed using an electric mixer with a paddle attachment until creamy, 1-2 minutes.
- Add the cocoa-powdered sugar mixture about a cup at a time. Beat on low speed when you first add it, then turn the speed up to high and beat for about a minute with each addition. Add the vanilla, followed by the milk or heavy cream.
- DECORATING THE CUPCAKES
- Cut the mini marshmallows in half and then slice them lengthwise. This should give you little mouth shapes.
- Scoop the buttercream into a piping bag fit with a large round tip. Pipe the buttercream upward using circular motions making sure to lift the tip up when completing the swirl.
- Gently place the eyes and mouths on them and enjoy!
Nutrition
Please note that nutritional values are created by an online calculator and should only be used as an estimate.
Beck
My kiddo loved these and has requested them as a repeat for his birthday!
Natalie Ward
Hi Becky! Aww that put such a big smile on my face! I’m so happy your son loved these and flattered that he requested them for his big day! Hope he has an awesome birthday!
[email protected]
funny and delicious recipe lulz
Natalie
Hi! Thanks so much for making these cupcakes! So happy you enjoyed them. They are definitely fun! hehe 🙂
Dana D Griffey
Can I use lowfat buttermilk?
Natalie
Hi Dana, yes that would work! Hope you enjoy these cupcakes 🙂
[email protected]
Silly and fun recipe I tried with the hubs 👌😋
Lynda Kean
HI,
What flour and which sugar please?
Natalie
Hi Lynda, All purpose and granulated 🙂 Thanks for asking! I will be sure to update the recipe to be more specific. Please let me know if you have any other questions!
Tara
I see now I was to mix with the egg mixture. As I said not a baker!! Making them again though;)
Natalie
Hi Tara! I’m glad you found the sugar in the recipe 🙂 Thank you for making these cupcakes! I hope they turn out great! Please let me know if you have any questions! Natalie
Tara
I am not a baker but followed the recipe directions for the cupcakes…realized after baked the obvious ingredient was missing and also missing in your directions unless they are meant to be sugarless. I will use them for trifle now:)
Tara
I see now I was to mix with the egg mixture. As I said not a baker!! Making them again though;)
Sam
These poop emoji cupcakes are not only super chocolatey and gooey but they are so much fun to bake. I baked these with my three boys and oh my they were super giggly and happy to be sampling while decorating.
Natalie
Hey Sam! Thank you so much for making these poop emoji cupcakes! I’m so happy you enjoyed the recipe and that it made your boys giggle! 🙂
Varina
Hello, can you please tell me how many grams is a stick of butter?
Natalie
Hi Varina, A stick of butter is equal to 113 grams. Please let me know if you have any other questions 🙂 Natalie
Celica
I need to make 24 cupcakes. Have you doubled the recipe with success, or should I make 2 separate batches?
Natalie
Hello, I haven’t doubled the recipe before, so I can’t say for sure what the result would be. I’m sorry I couldn’t be more help with that. It might be better to make two separate batches to be sure they’ll turn out.