

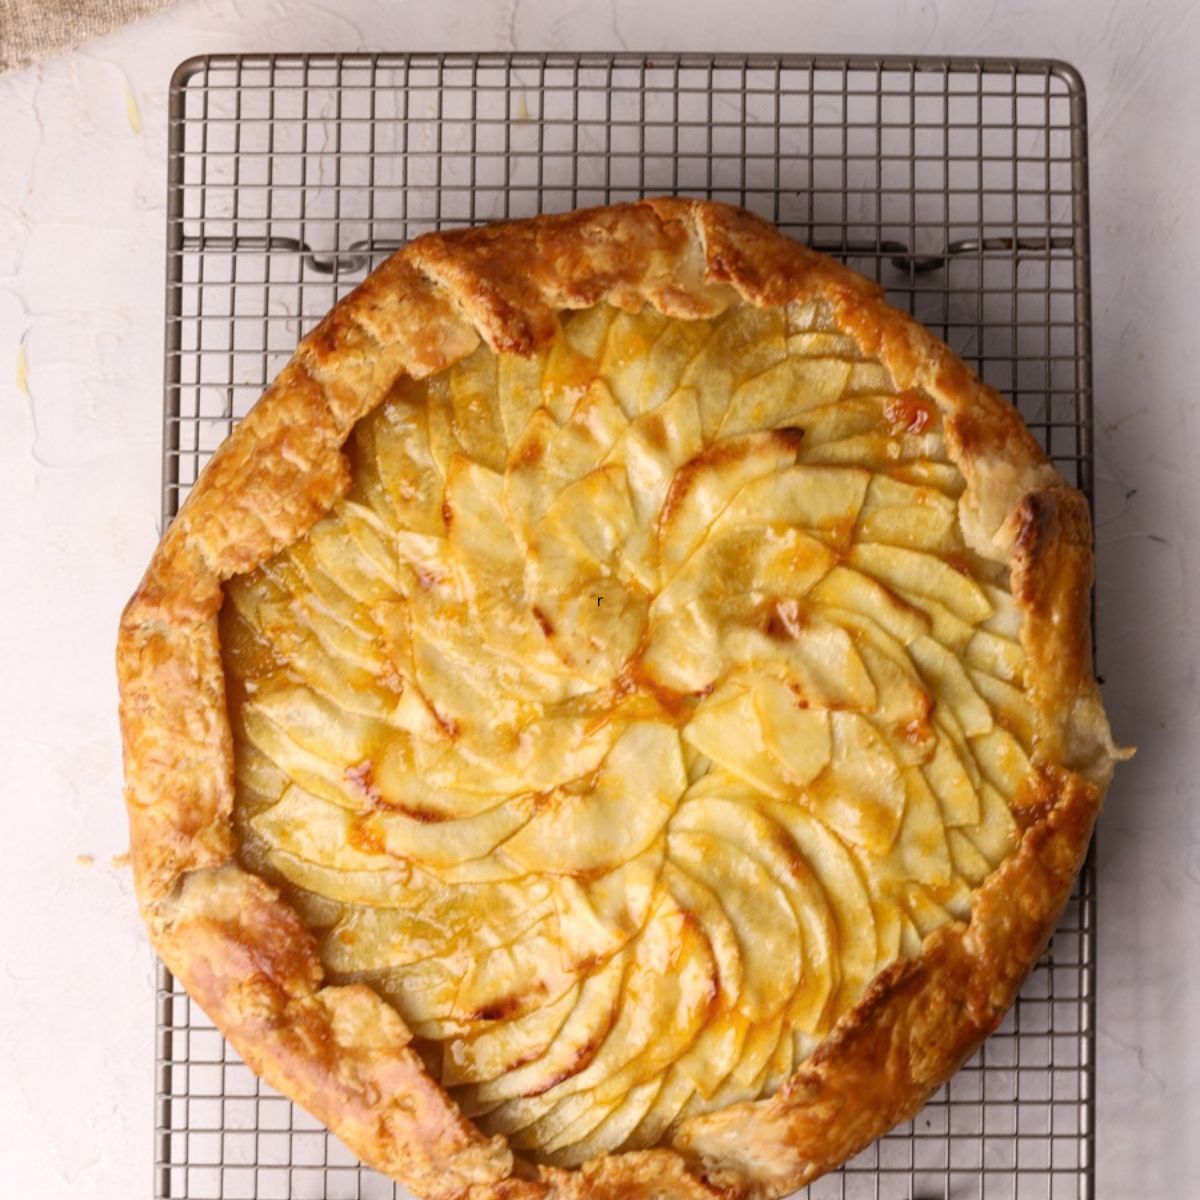
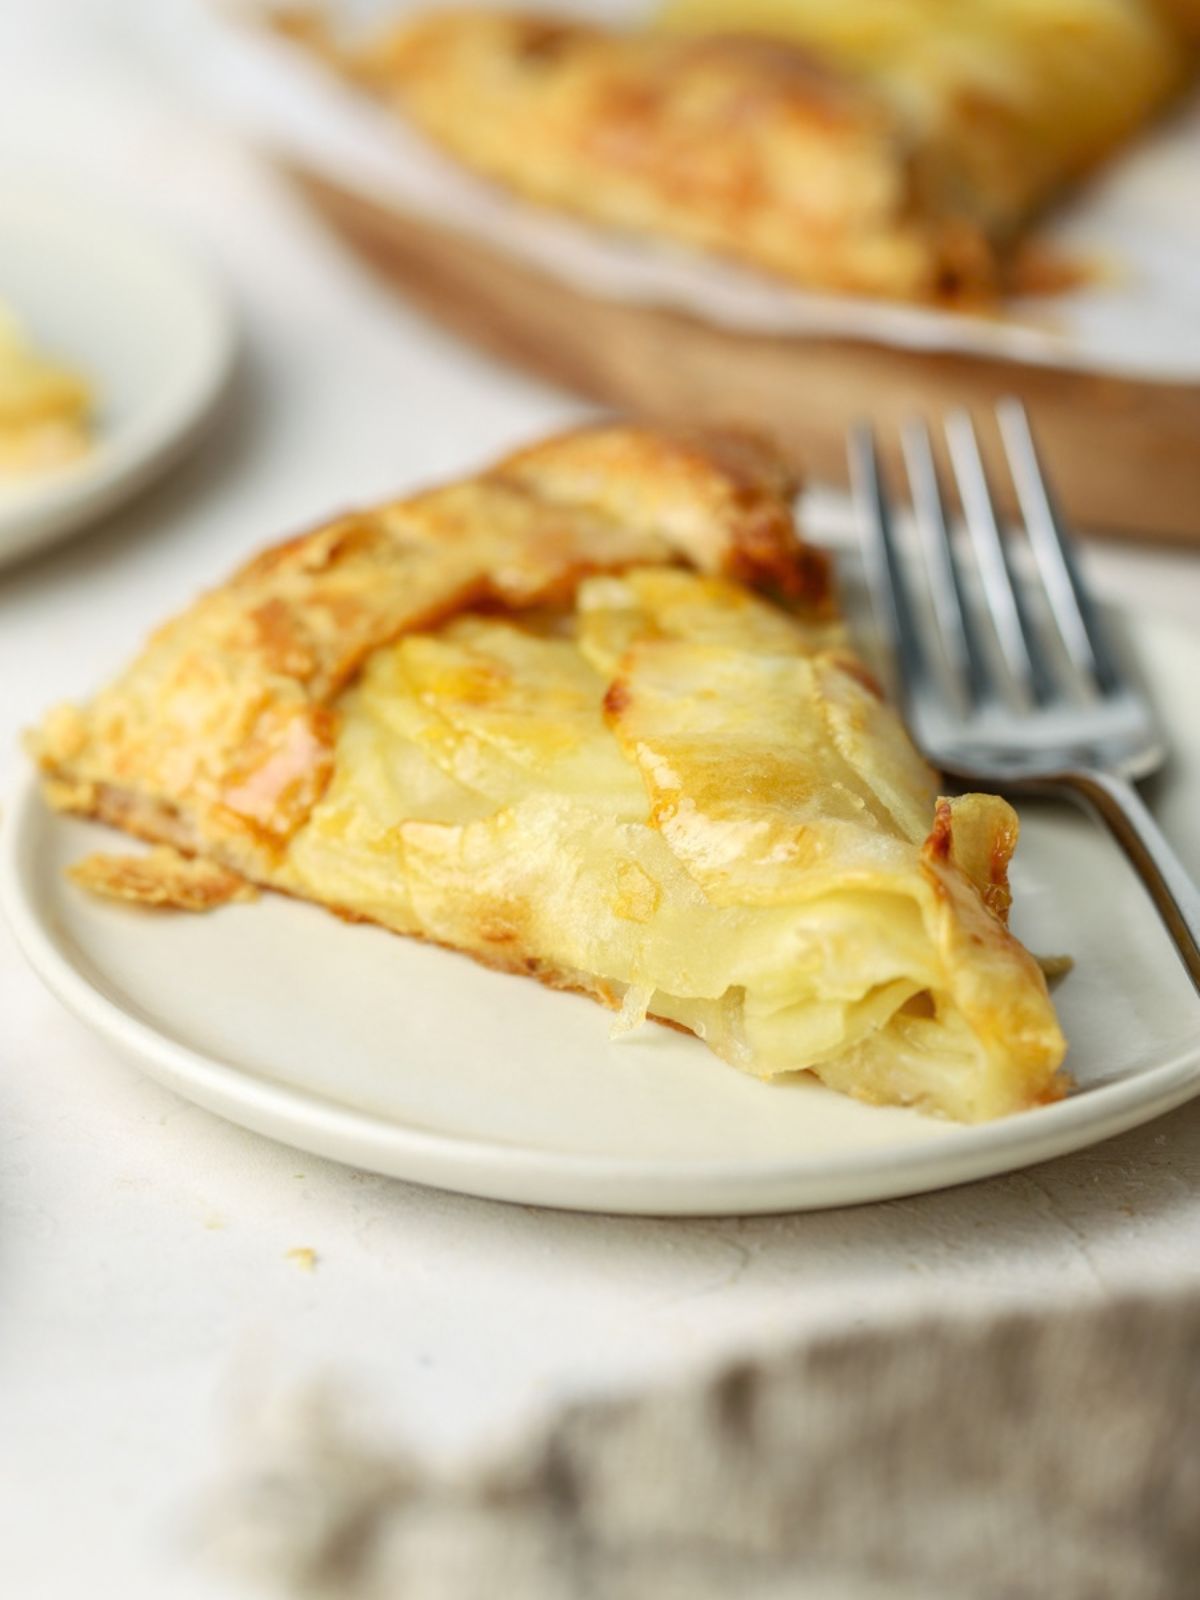
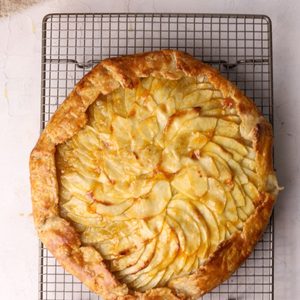
This rustic apple tart starts with a buttery crust layered with a soft apple compote and caramelized apple slices on top. A warm apricot glaze gives it a bakery-style finish.
I’m all about simple pies and tarts like this. How simple is it? Well, it’s made with basic ingredients and you don’t need special tart pan to make it!
Would you like to save this?
I love all things apple (have you tried my apple turnovers made with phyllo dough?). 🍎🍏 Apples add both tart flavor and sweetness.
This apple tart recipe is a simplified adaptation of the French apple tart I learned to make during my first month at Le Cordon Bleu. My apple compote is similar to the one we made in class since it was my favorite part. ❤️
I love the traditional pate brisee or short crust pastry we made in pastry school, but left it out because you’d need a tart pan or pastry ring to make it. This recipe uses my easy homemade pie crust recipe and is baked right on a baking sheet!
I love coming up with different apple desserts like my apple pie with crumble topping and apple cinnamon coffee cake.
Jump to:
- Apple Compote and Apple Slices in Apple Tart: Why They Work
- Why You’ll Love This Recipe
- Apple Tart Ingredients
- Substitutions and Variations
- How Do You Cut Apples For apple Tart (Including dicing for Compote and Slicing for Topping)
- How do i make an apple tart?
- Instructions
- Natalie’s Top Tips
- Recipe FAQs
- More Recipes You’ll Love
- Apple Tart
Apple Compote and Apple Slices in Apple Tart: Why They Work
Many apple tarts don’t have a compote layer, so it’s a delicious surprise to bite into! It adds a subtle, warm vanilla flavor underneath the apple slices.
The apple slices on top are a total showstopper however you arrange them. They’re thinly sliced, brushed with butter and sprinkled with sugar. Let the tips caramelize in the oven for the best color and flavor, then finish with a brushing of warm apricot glaze.
Why You’ll Love This Recipe
- The crust bakes up flaky and buttery. (It’s the same recipe I use for my berry galette recipe).
- Bakery style at home! The recipe’s easy enough for even beginning bakers! No advanced techniques or tart pan needed.
- The apricot glaze gives it shine and a little extra fruit flavor.
Apple Tart Ingredients
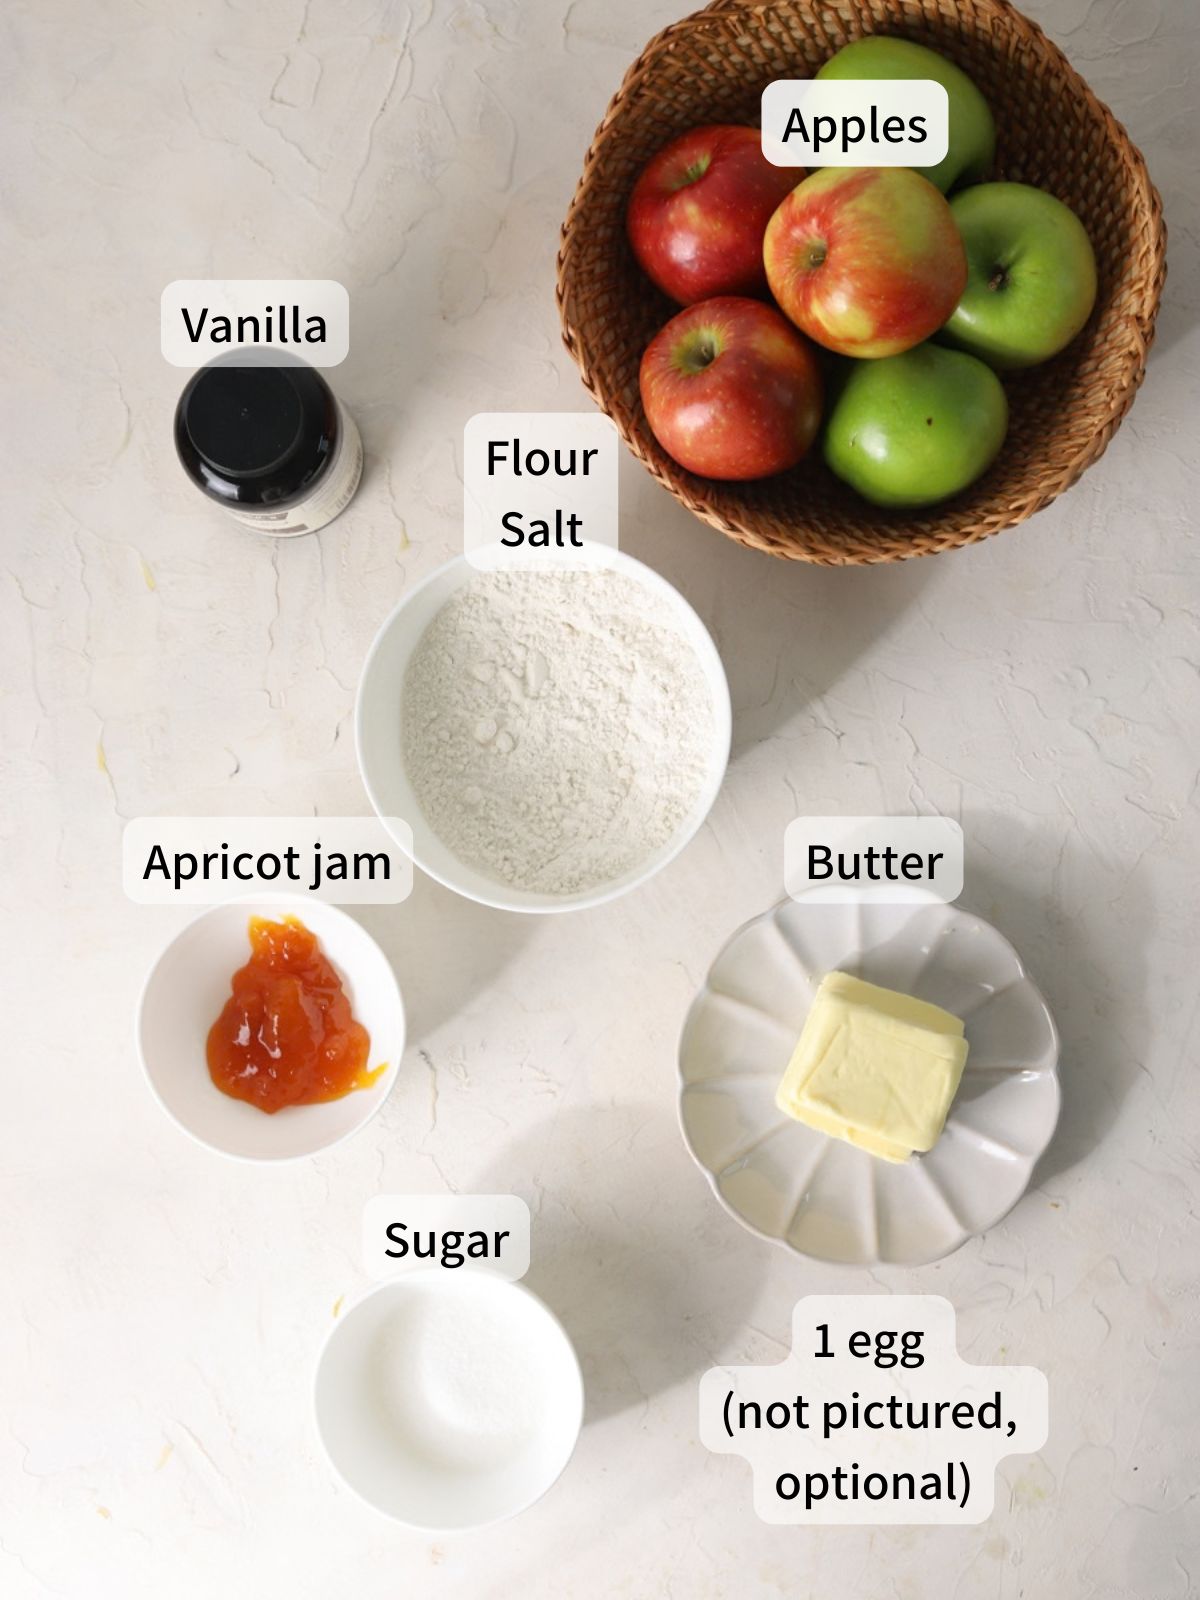
This isn’t your average apple tarte. It’s filled with layers of flavor from apple compote to glazed apples that make it taste extra special. Here’s what goes into it:
- Crust: You can use store-bought pie crust or make your own. For homemade, you’ll need flour, sugar, salt, ice water, and cold butter. You don’t need any special techniques or equipment and it bakes right on a baking sheet!
- Butter: If you make homemade dough, you’ll need cold butter. Butter makes the crust flavorful and helps it bake up flaky. Butter’s optional in the compote, but adds richness. We also use melted butter to brush the apple slices before sprinkling them with sugar. I use unsalted butter. If you use salted butter, reduce the added salt in the crust to ¼ teaspoon.
- Apples: Plan on 3 Granny Smith apples for the compote and 2 to 3 Gala, Golden Delicious, or Honeycrisp apples for the topping. Using different apples for the compote and topping gives a nice balance of tart, sweet flavor. Peel, core, and chop the compote apples into roughly 1/4-inch cubes. Peel and very thinly slice the topping apples to about 1/16 inch. Use any extra apples to make my apple oat bars!
- Sugar: The compote is sweetened with granulated sugar and we sprinkle the apple slices with sugar before baking!
- Vanilla: Vanilla adds a warm flavor to the compote. Half a vanilla bean gives the best flavor, but vanilla extract or vanilla bean paste both work well too.
- Apricot jam: This is used as a glaze brushed over the tart after baking. Warm it with a little water on the stovetop or in the microwave. It gives the tart a glossy, bakery-style finish.
- Egg: It’s optional but I recommended brushing beaten egg on the crust before baking. It gives the crust a deep golden color.
See recipe card below for a full list of ingredients and measurements.
Substitutions and Variations
- Out of Granny Smith apples? Use Golden Delicious or Honeycrisp apples instead.
- Instead of vanilla, add a little cinnamon to the compote. I’d start with 1/2 teaspoon and add more to taste.
- Not a fan of apricot jam? Peach or apple jelly works as a substitute.
- Don’t have any jam? You could also skip the jam and dust the tart with powdered sugar right before serving. You could also turn this recipe into caramel apple tart, by drizzling salted caramel sauce over it!
- Looking for a little seasonal twist? Use pears instead of apples, or try a mix of both.
- No egg on hand? Brush the crust with melted butter instead. It won’t give quite the same deep golden shine, but helps the crust brown nicely.
How Do You Cut Apples For apple Tart (Including dicing for Compote and Slicing for Topping)
Follow these first two steps whether you’re cutting apples for the compote or the topping.
Step 1: Peel the apples with a vegetable peeler, potato peeler or paring knife.
Step 2: Cut the apple in half from top to bottom. Use a melon baller to scoop out the core from each half. Cut a small V-shaped notch at the top and bottom to remove the stem and bottom ends.
Once you’ve done that, the cutting method is different depending on which part you’re prepping.
For the compote: Turn the apple half cut side down with the stem end faces to the side. Slice it in half again, parallel to the cutting board, the way you’d cut an onion. Then dice the apple, rotating and dicing across again until it’s fully diced.
For the topping: Turn the apple half cut side down, with the stem end facing to the side. Use a sharp paring knife or chef’s knife to carefully slice into thin, even pieces, about 1/16 inch thick. Keep the slices from each half together as you cut (see picture 3 in the step-by-step instructions below). This makes it easier to fan the apples out on the tart.
How do i make an apple tart?
Quick video recap
Instructions
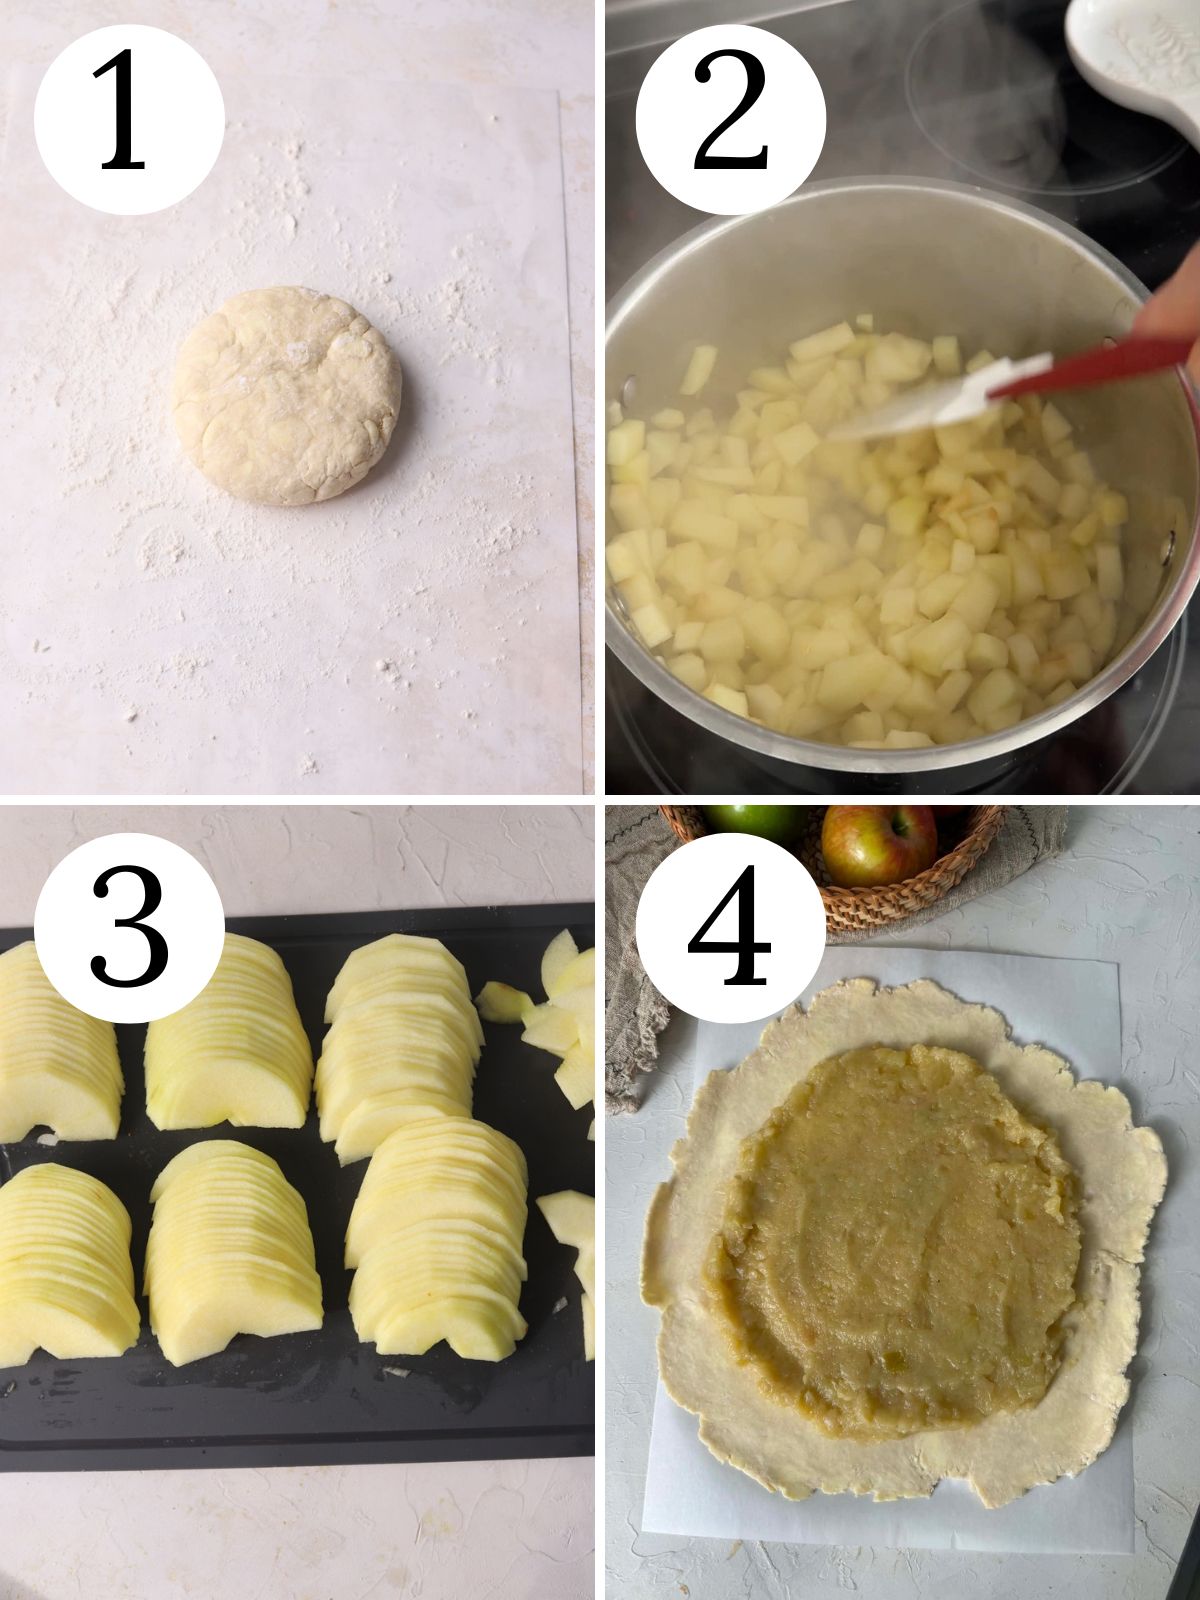
Step 1: Make and chill the pie dough. Check out my post on my easy pie crust recipe for step by step photos.
Chill it at least 1 hour or up to 2 days in the fridge, then make the apple compote.
Step 2: Make the apple compote. Stir together the apples, sugar and salt in a saucepan. (Add half a vanilla bean now if using. For vanilla extract or vanilla paste, add it with the butter). Cover and cook for about 15 minutes, stirring occasionally. Add a little water if needed. Stir in the butter and vanilla extract or paste. Cook until apples are cooked through, around 20-24 minutes total.
Step 3: Roll dough out on a lightly floured surface into a 14 inch circle (not pictured). Transfer dough to a sheet of parchment paper. Very thinly slice the remaining apples (Picture 3 above). Slice to about 1/16 inch thickness. Save any broken or tiny apple slices in a small bowl.
Step 4: Spread the apple compote over your chilled crust. Leave a 1 and a half to 2-inch border.
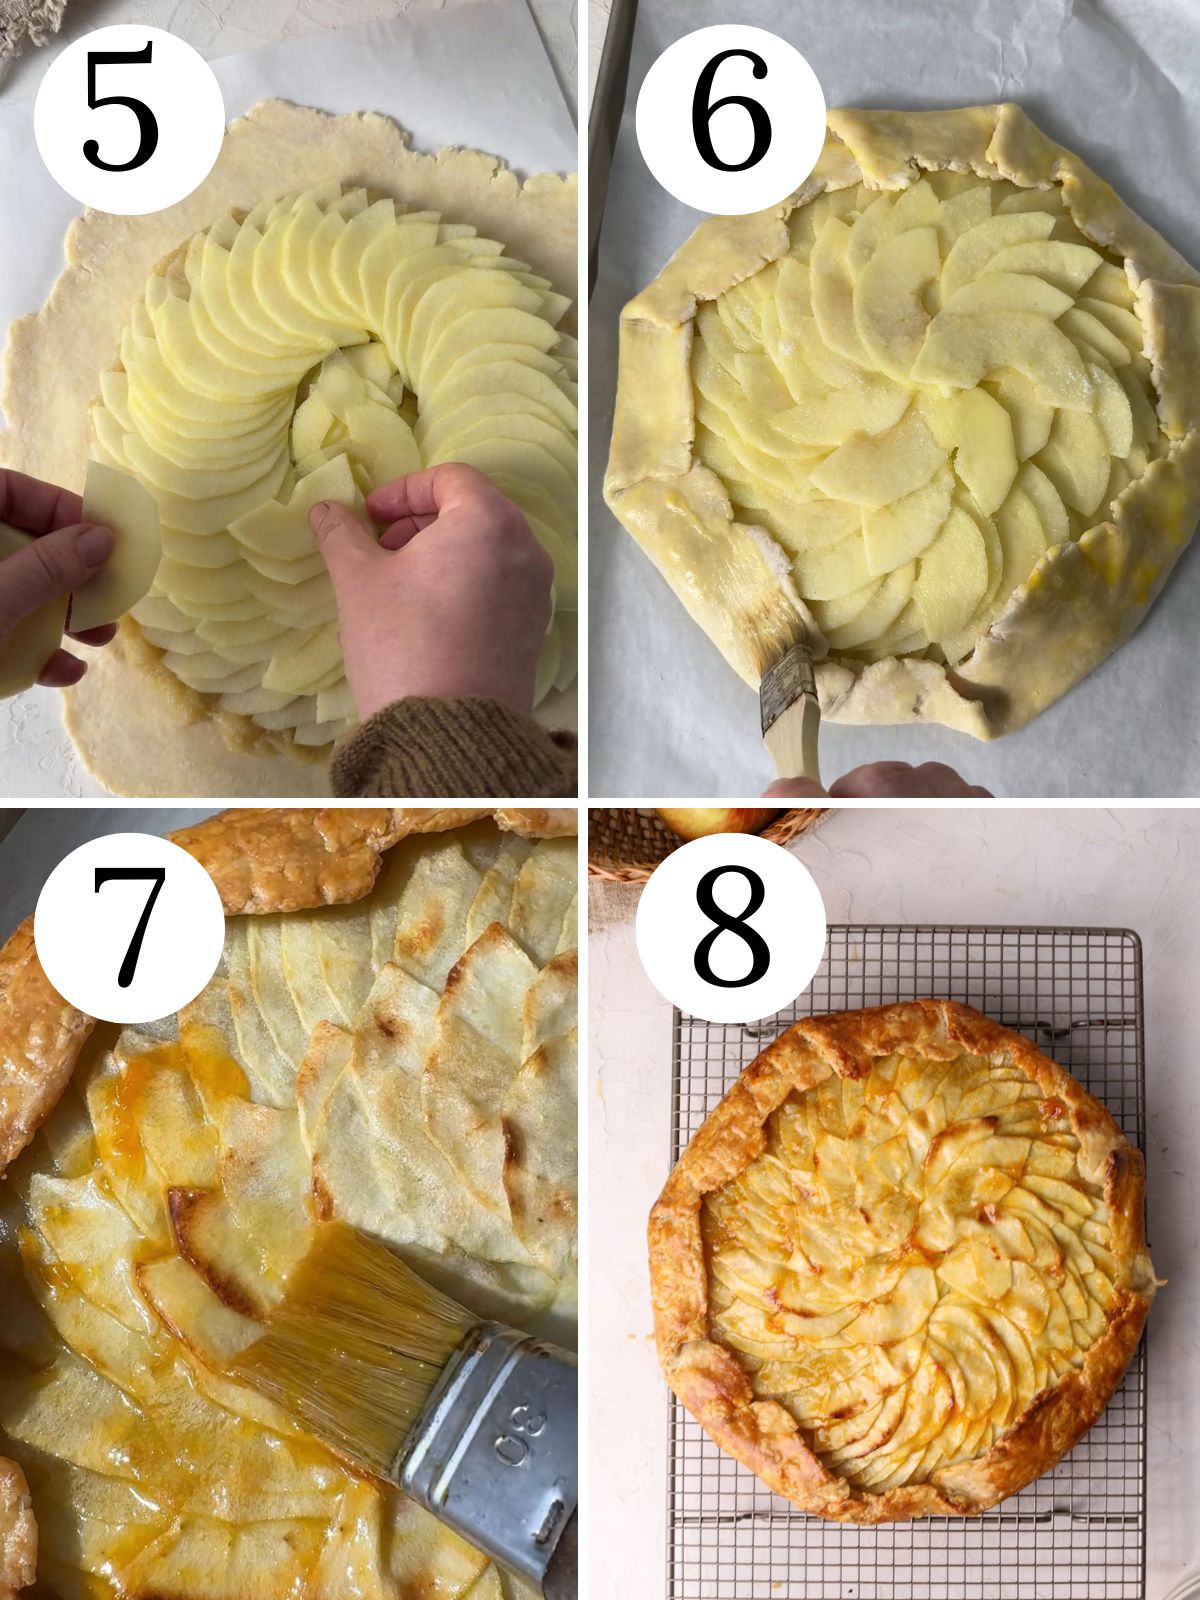
Step 5: Assemble the tart. Scatter some of the tiny or broken apple slices over the compote and in the center. Next, arrange the apple slices in about 3 overlapping circles. Fold the edges. Slide the parchment with the tart onto a baking sheet. Chill tart in the freezer while you preheat your oven to 400°F.
Step 6: Bake. Brush the crust with beaten egg. Brush the apple slices with melted butter and sprinkle with sugar. Bake for 40-46 minutes until crust is golden brown and the apple slices are caramelized.
Step 7: Brush with apricot glaze. When the tart’s almost finished baking, whisk together the apricot jam and water. Heat in the microwave for 20 seconds or stovetop for about 3 minutes. Gently brush it over the apple slices immediately after baking.
Step 8: Allow tart to cool. Slide tart onto a cooling rack. Allow to cool slightly. Serve warm or room temperature.
Natalie’s Top Tips
- Slice the apples for the topping very thinly-Thinly sliced apples will have a more tender to bite into. If you cut the slices too thick, they will be crunchier.
- Slice them evenly– so that they bake up consistently throughout the tart.
- Overlap the apple slices slightly- Apples shrink down when they bake, so it’s best to overlap them.
- Chill the tart before baking-This helps it holds its shape. I usually chill mine while the oven preheats.
- Bake until the crust is deep golden brown and the apple tips are caramelized– for the best flavor and texture.
- Glaze while warm– Brushing with apricot jam right after baking keeps the apples looking glossy and keeps them from looking dry.
- Let the tart cool slightly before slicing– This gives the compote and apple slices time to settle.
Recipe FAQs
No. The crust doesn’t need to be blind-baked first.
Yes! Swap in either store bought pie crust.
I like Granny Smith for the compote and Gala, Golden Delicious, or Honeycrisp for the topping. Mixing tart and sweet varieties adds more flavor than using just one kind. I don’t recommend McIntosh apples in this recipe since they get mushy when baked.
Store in an airtight container in the fridge for up to 4 days.
More Recipes You’ll Love


Did you try this recipe or any other recipe on my website? Please leave a 🌟star rating below and let me know how you enjoyed it in the 📝 comments below.
Don’t forget to tag me on Instagram, Facebook, and Pinterest!
Apple Tart
Ingredients
Homemade Crust (skip if using store bought)
- 1¼ cups (156 g) all purpose flour plus a little more for rolling out the dough
- 1½ teaspoons (6 g) granulated sugar
- ½ teaspoon (3 g) salt
- ½ cup (113 g) unsalted butter cold and cut into ½ inch cubes
- 4 tablespoons (60 g) water ice cold, amount of water will vary between 4-5 tablespoons, I usually use about 4 tablespoons
Apple Compote
- 3 (550 g) Granny Smith apples or Golden Delicious, peeled, cored, cut in half, diced into ¼ inch cubes
- 1/4 cup (50 g) sugar
- 1 teaspoon (4 g) vanilla extract or 1/2 vanilla bean
- 3 tablespoons (42 g) unsalted butter
- 1 pinch salt
Sliced Apple Layer
- 3 (400 g) Gala apples peeled, cored, cut in half, thinly sliced, about 1/16 inch (1.5mm) thick, or use Golden Delicious or Honeycrisp
- 2 tablespoons (28 g) unsalted butter
- 1½ tablespoons (18 g) sugar
Decoration (optional)
- 1 (50 g) large egg optional, for brushing on the crust
- 3 tablespoons (60 g) apricot jam optional
- 1½ tablespoons (22 g) water optional
Instructions
Homemade Crust (skip if using store bought)
- Cut the cold butter into ½ inch cubes. Place the butter in the fridge while you measure the rest of your ingredients.Measure ¼ cup of cold water* in a bowl. Add a few ice cubes into the water and swirl the ice around. Place the bowl of water in the fridge until needed. You can also place the bowl in the freezer for a few minutes to ensure the water is very cold.
- Take out all the things you will need so that you don't have to go looking for them while making the dough. Take out a spatula, fork, pastry cutter (if using). and some plastic wrap.
- In a large mixing bowl, whisk to combine the flour, sugar and salt. Add the cubed butter. Use a spatula to toss the butter so it's fully coated with flour. Use the spatula to separate the butter cubes til they're all lightly coated.
- Next, use a pastry cutter to start to cut the butter into the dry ingredients. Use one hand to turn the bowl while the other hand uses the pastry cutter. Try not to aim for the same spot in the bowl each time and aim to slice through butter with each stroke. When the pastry blender clogs up with butter, clean it out with a butter knife. Use a spatula or your fork to toss the ingredients a little to make sure the butter stays coated with flour. Continue blending with the pastry cutter and turning the bowl until the largest pieces are no larger than peas.
- I recommend placing the bowl in the fridge to chill for 5 minutes at this point. This is optional, but it will help keep the ingredients cold.
- Next, make a well in the center of the bowl. Pour 2 tablespoons of the cold water (without the ice) into the well. Toss/stir the mixture with a fork to distribute the water. It should be clumpy with some dry spots at this point. Break up any sticky spots. Add 1-2 more tablespoons of water or cold vodka. Stir around with a fork til you don't see anymore pools of liquid anywhere.
- Use your hands to scoop as much of the mixture as possible then press it back down onto the rest of the mixture with your fingertips. Sprinkle or flick a tiny bit of water right onto any very dry spots if you notice them. Turn the bowl about a quarter turn and quickly repeat this process a few more times so that the mixture comes together. Knead only as much as needed to combine the dough. Stop kneading when the dough has come together and there are no longer any loose floury bits on the bottom of the bowl.
- Do not add any more water than you need. The dough will feel moist but not wet. (I typically use about ¼ cup of liquid or maybe a touch more).
- Shape the dough into a ball then set it on a sheet of plastic wrap. Gently pat it into a 1 inch thick disc. Seal any broken edges by pushing the edges of the dough gently on the counter. Wrap dough with a double layer of plastic wrap. Set dough in the fridge for at least 30 minutes, preferably 1-2 hours or up to 2 days. While the dough chills, make the apple compote.
Apple Compote
- Add the apples, sugar, and salt to a medium saucepan set over medium heat. If using a vanilla bean, scrape half the bean's caviar (seeds) directly into the apples. If using vanilla extract or paste instead, add it in with the butter. Cover and leave at medium heat for about 15 minutes, stirring occasionally. Add a little water (about 1 tablespoon) if apples become dry).
- Stir in the butter (if using vanilla extract or vanilla paste, add it now). Press down on the apples a little with your spatula then cover and continue cooking until apples have softened and cooked through. The compote should take around 20-24 minutes total.
- Transfer compote to a bowl and cover with plastic wrap. Place the compote in the fridge and let cool slightly before adding to the base of the tart. The compote should be slightly warm when you add it to the crust.
Assembly and Decoration
- For store bought crust, place the pie crust flat on a baking sheet with parchment paper.For homemade pie dough, roll dough out on a lightly floured surface into a 14-inch circle. Transfer dough to a baking sheet lined with parchment paper. I don't trim the edge, but you can if you want a neater look.
- Cover dough with plastic wrap then chill dough again for 20–30 minutes.
- Peel and core the remaining apples, then cut in half through the stem. Lay each half on its side, with the stem end facing sideways rather than up. Slice crosswise into thin, even pieces, about 1/16 inch thick, using a sharp paring knife, chef's knife or mandoline. Save any broken pieces or very small pieces in a small bowl.
- Take out the chilled dough. Use an offset spatula or the back of a spoon to spread the slightly cooled compote over the dough, Leave a 1½ to 2 inch border. Scatter some of the broken apple slices over the compote.
- Arrange the apple slices in about 3 overlapping circles inside your crust. Add any additional apple offcuts in the middle before covering them with the final, smaller middle circle of apple slices. Gently fold edges and tightly press down to seal the dough.
- Slide the parchment with the tart onto a baking sheet. Place the baking sheet with the tart in the freezer and preheat your oven to 400°F. If you don't have space in the freezer, chill in the fridge for at least 20 minutes.
- Beat the egg in a small bowl. (If you're not using an egg, you can brush the crust with about 2 tbsp melted butter). Once the oven's pre-heated and the crust is cold and firm, use a pastry brush to brush the crust with egg. Next, brush to gently brush the apple slices with melted butter and sprinkle them with sugar.
- Bake for 40-46 minutes until the crust and apple slices are golden brown.
- When the tart is almost finished baking, prepare the apricot topping. Whisk together the apricot jam with the water in a small bowl. Heat in the microwave for about 20 seconds, until bubbling or whisk it in a small saucepan set over medium heat for about 3 minutes.
- Brush the apple slices gently with the warmed apricot jam right after baking. Transfer the pan to a rack to let tart cool. Enjoy warm or at room temperature.
Video
Notes
Nutrition
Please note that nutritional values are created by an online calculator and should only be used as an estimate.

Mikayla
The best apple tart recipe I have ever made! It turned out absolutely delicious.
Natalie Ward
Awww! Thank you so much Mikayla! So happy you enjoyed it.
Laura
I made the Apple Tart, and it was absolutely delicious! The crust was perfectly buttery, and the apple filling had just the right balance of sweetness and flavor. It’s the perfect fall dessert, and my family loved it. I especially appreciated that the egg was optional, as my son, who has an egg allergy, was able to enjoy it as well. This recipe is definitely a keeper, and I’ll be making it again
Natalie Ward
Oh my goodness this is so nice to hear! Thank you for making this tart and for your helpful feedback, Laura! Have a great day 🙂